


 Español
Content
- 1 Understanding Why Luggage Wheels Stop Rolling Smoothly
- 2 Cleaning Debris and Buildup From Wheel Assemblies
- 3 Lubricating Bearings and Moving Parts
- 4 Repairing or Replacing Damaged Wheels
- 5 Addressing Bent Axles and Mounting Problems
- 6 Preventive Maintenance for Long-Term Performance
- 7 Upgrading to Higher Quality Wheels
- 8 When to Replace Rather Than Repair
Understanding Why Luggage Wheels Stop Rolling Smoothly
Luggage wheels endure tremendous stress during travel, rolling across various surfaces from smooth airport floors to rough pavement, enduring impacts from being tossed onto conveyor belts, and carrying substantial weight that puts constant pressure on bearings and axles. Over time, these demands cause wheels to develop problems that impede smooth rolling. The most common issues include accumulated debris wrapped around axles, dried or contaminated wheel bearings, damaged or flat-spotted wheel surfaces, bent axles from impacts, and general wear that creates play or wobble in the wheel assembly. Understanding the root cause of your particular wheel problem is the first step toward implementing the right solution.
Different wheel types exhibit distinct failure patterns that require specific approaches. Inline skate-style wheels with exposed bearings tend to accumulate hair and thread that wraps around the axle, creating friction that prevents free rotation. Recessed wheels common on hardside luggage often trap small stones or debris in the wheel housing, causing grinding sounds and resistance. Multi-directional spinner wheels can develop problems with their swivel mechanism, preventing the wheel assembly from rotating freely on its vertical axis even when the wheel itself spins normally. Recognizing which component has failed—the wheel surface, bearing system, axle, or mounting hardware—determines the appropriate repair strategy and helps you gather the right tools and materials before beginning work.
Cleaning Debris and Buildup From Wheel Assemblies
The simplest and often most effective improvement to luggage wheel performance comes from thorough cleaning to remove accumulated debris. Begin by examining each wheel closely, looking for visible hair, thread, or fabric fibers wrapped around the axle where it enters the wheel. These materials create surprising amounts of friction and can completely prevent wheel rotation in severe cases. Use small scissors or a seam ripper to carefully cut away wrapped fibers, taking care not to damage the wheel or axle. A crochet hook or bent paperclip works excellently for pulling out debris from tight spaces around the axle and within wheel recesses.
For wheels recessed into housing pockets, remove trapped stones, dirt, and debris using compressed air, a stiff brush, or a vacuum with a crevice attachment. Pay particular attention to the gap between the wheel and housing where materials commonly lodge and prevent free rotation. If wheels are particularly dirty or sticky, remove them from the luggage for more thorough cleaning. Most luggage wheels attach with screws, bolts, or rivets accessible from inside the luggage case. Document the assembly with photos before disassembly to ensure correct reassembly later. Once removed, wash wheels in warm soapy water using a brush to scrub away accumulated grime, rinse thoroughly, and dry completely before reinstallation or further maintenance.
Tools and Materials for Effective Cleaning
- Small scissors or seam ripper for cutting away wrapped fibers and threads
- Tweezers or needle-nose pliers for extracting debris from tight spaces
- Stiff brush or old toothbrush for scrubbing wheel surfaces and housings
- Compressed air can for blowing debris from wheel assemblies
- Mild detergent and warm water for washing particularly dirty components
- Clean rags or paper towels for wiping and drying
Lubricating Bearings and Moving Parts
Proper lubrication dramatically improves wheel performance by reducing friction in bearings and at contact points between moving components. However, selecting the right lubricant and applying it correctly proves crucial—wrong lubricant choices can actually attract debris and worsen problems over time. For luggage wheel bearings, avoid heavy greases that trap dirt and instead use light oils or specialized bearing lubricants. Silicone-based lubricants work well as they resist attracting dust while providing good lubrication and moisture resistance. PTFE-based dry lubricants offer excellent performance without the sticky residue of oils, though they require more frequent reapplication.
To lubricate wheel bearings, first clean them thoroughly as described previously, ensuring all old lubricant and debris are removed. For wheels with exposed bearings, apply lubricant directly to the bearing race—the circular channel where ball bearings ride. Spin the wheel while applying lubricant to distribute it evenly throughout the bearing. Use lubricant sparingly; excess attracts dirt and creates mess without improving performance. For sealed bearings common in higher-quality luggage, lubrication opportunities are limited, but you can often work small amounts of penetrating oil into the bearing seals at the edges. Apply lubricant, allow it to penetrate for several minutes, then spin the wheel repeatedly to distribute the lubricant internally.
Spinner wheel assemblies benefit from lubricating both the wheel bearing and the swivel mechanism. The vertical post and bearing assembly that allows the wheel to rotate 360 degrees requires periodic lubrication to maintain smooth operation. Apply lubricant to the visible portions of the swivel post, rotate the wheel assembly through its full range of motion, then wipe away excess. Some spinner assemblies have grease fittings that accept lubricant through a small port, while others require disassembly for proper lubrication access. Consult your luggage manufacturer's guidance if available, as over-lubricating swivel mechanisms can cause them to attract excessive dirt and fail prematurely.
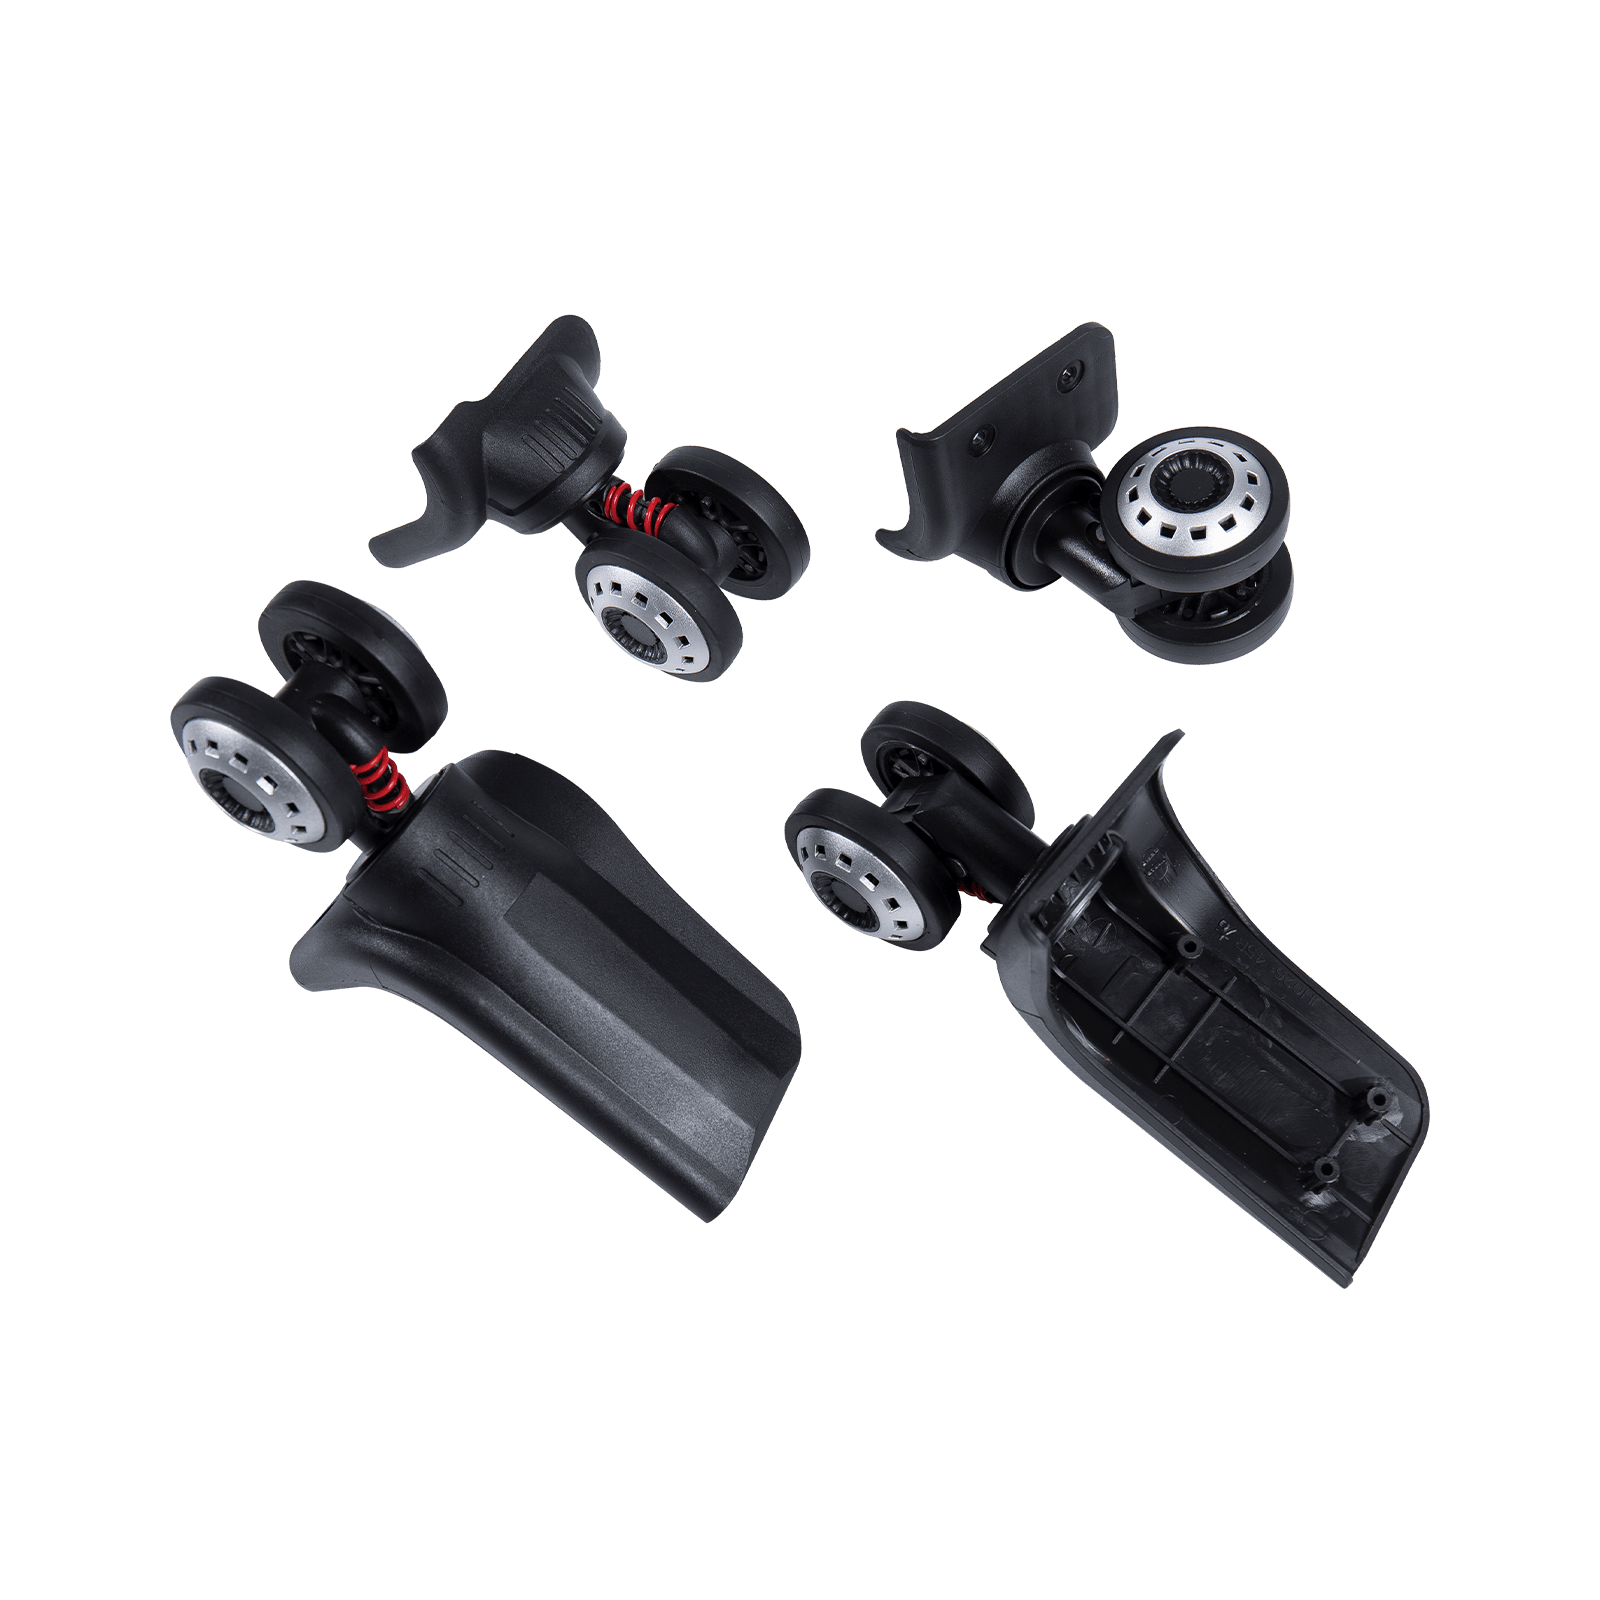
Repairing or Replacing Damaged Wheels
When cleaning and lubrication fail to restore smooth rolling, the wheels themselves may require repair or replacement. Common wheel damage includes flat spots from dragging, cracks in the wheel material, chunks missing from impacts, and worn surfaces that no longer provide good traction or smooth rolling. Minor surface damage sometimes responds to careful sanding with fine-grit sandpaper to smooth rough spots, though this works best on softer polyurethane wheels rather than hard plastic varieties. Significant damage necessitates complete wheel replacement to restore proper function.
Replacement wheels are available from luggage manufacturers, luggage repair shops, and online retailers specializing in luggage parts. When ordering replacements, you need specific measurements and specifications to ensure compatibility. Measure the wheel diameter accurately, typically ranging from 40mm to 70mm for most luggage. Measure the wheel width and the axle diameter or bolt size used to mount the wheel. Determine whether wheels are inline style or spinner/swivel type. Note the wheel material—polyurethane provides quiet operation and good durability while hard plastic offers lighter weight but noisier rolling. Some manufacturers sell wheels in sets of two or four, while others offer individual replacements.
| Wheel Type | Typical Diameter | Best Material | Average Cost |
| Inline (fixed direction) | 50-60mm | Polyurethane | $8-15 per pair |
| Spinner (multi-directional) | 40-50mm | Rubber or polyurethane | $12-25 per wheel |
| Heavy-duty inline | 60-70mm | Polyurethane with ball bearings | $15-30 per pair |
Step-by-Step Wheel Replacement Process
Replacing luggage wheels requires basic tools and moderate mechanical aptitude. Begin by accessing the wheel mounting hardware, usually located inside the luggage case. Empty the luggage completely and examine the interior lining near each wheel. Some luggage has removable panels or flaps providing direct access to mounting bolts, while others require cutting or removing glued interior fabric to reach fasteners. Use appropriate screwdrivers or hex keys to remove mounting bolts, keeping track of any washers, spacers, or bushings that must be reinstalled with new wheels. Support the luggage to prevent it from falling when wheels are removed.
Install new wheels by positioning them correctly—note that spinner wheels have specific orientations and inline wheels must align properly for the luggage to roll straight. Insert mounting bolts through the wheel assembly and luggage frame, adding any spacers or washers in their original positions. Tighten bolts firmly but avoid overtightening, which can crack plastic wheel housings or deform the luggage frame. If bolts were originally secured with threadlocker compound to prevent loosening, apply a small amount to replacement bolt threads before installation. Test wheel operation before fully reassembling interior linings—wheels should spin freely without binding or excessive play. Rock the wheel gently to check for looseness indicating insufficient tightening or missing hardware.
Addressing Bent Axles and Mounting Problems
Sometimes wheel rolling problems stem not from the wheels themselves but from bent axles or damaged mounting points on the luggage frame. Impacts from baggage handling can bend metal axles or crack plastic mounting brackets, causing wheels to bind or sit at incorrect angles. Inspect axles carefully for any visible bending or deformation. Minor bends in steel axles can sometimes be straightened using pliers and careful force, though severely bent axles should be replaced to ensure reliable operation. Plastic mounting points that have cracked or broken often cannot be satisfactorily repaired and may require professional luggage repair services or creative solutions like reinforcing mounts with epoxy and metal brackets.
Loose wheel mounting represents another common problem that causes poor rolling performance. Bolts that have loosened allow wheels to wobble and bind against their housings. Check all mounting bolts for tightness and retighten as needed. If bolts repeatedly loosen, apply threadlocker compound to the threads to maintain proper tension. Stripped bolt holes in plastic luggage frames present a challenging repair. Solutions include using slightly larger diameter bolts with new threads, filling stripped holes with epoxy and re-drilling, or installing threaded inserts that provide fresh threads for mounting bolts. These repairs require care to avoid making problems worse, and professional repair services may offer better outcomes for valuable luggage.
Preventive Maintenance for Long-Term Performance
Regular preventive maintenance significantly extends luggage wheel life and maintains smooth rolling performance between major repairs. After each trip, take a few minutes to inspect wheels for wrapped debris, removing any accumulated hair or threads before they create friction problems. Wipe wheels clean of dirt and grime using a damp cloth, preventing buildup that works into bearings and causes premature wear. Store luggage with wheels off the ground when possible, either standing upright or lying flat, to prevent flat spots from developing during long storage periods when weight rests on stationary wheels.
Apply lubricant to wheel bearings and spinner mechanisms every 6-12 months depending on usage frequency. Frequent travelers benefit from quarterly lubrication, while occasional users can maintain adequate performance with annual service. Keep replacement wheels on hand for luggage you depend on regularly—having spares available prevents trip disruptions if a wheel fails before departure. When traveling, avoid dragging luggage whenever possible, as this creates flat spots and excessive wear on wheel surfaces. Lift luggage over curbs, stairs, and rough terrain rather than bouncing it down obstacles that can crack wheels or bend axles.
Upgrading to Higher Quality Wheels
If you own luggage with particularly poor factory wheels or experience frequent wheel failures, consider upgrading to higher-quality replacement wheels that offer superior performance and durability. Inline skate wheels designed for actual skating often fit luggage applications and provide sealed bearings, durable polyurethane construction, and smoother rolling than budget luggage wheels. These wheels typically cost more but justify the investment through dramatically improved performance and longevity. Select wheels with ABEC-rated bearings—ABEC-5 or ABEC-7 bearings offer excellent performance for luggage applications without the excessive cost of ultra-precision ABEC-9 bearings designed for competitive skating.
When upgrading spinner wheels, look for units with metal rather than plastic swivel mechanisms, as metal assemblies withstand the stresses of luggage use much better than plastic components. Ball-bearing swivel mechanisms provide smoother rotation and longer life compared to simple bushing designs. Some specialty luggage repair suppliers offer premium replacement spinner wheels specifically engineered for durability, featuring reinforced housings, sealed bearings, and impact-resistant wheel materials. While these upgrades increase initial costs, they often prove economical for frequently used luggage by eliminating repeated replacement cycles and providing superior performance that makes travel more pleasant and less physically demanding.
When to Replace Rather Than Repair
Sometimes the most practical solution involves replacing the entire luggage rather than continuing to repair failing wheels, particularly with inexpensive luggage where replacement wheels may cost nearly as much as new luggage. Evaluate the overall condition of the luggage—if zippers are failing, fabric is torn, handles are damaged, or the frame shows cracks in addition to wheel problems, replacement often makes better economic sense than extensive repairs. Calculate total repair costs including your time and compare against prices for new luggage with better wheel systems and updated features like USB charging ports, expandable compartments, and improved security features.
However, high-quality luggage from premium manufacturers justifies repair investment even when costs seem substantial. Brands known for durability often offer replacement parts support and repairable designs that allow decades of service with periodic maintenance. Sentimental luggage or pieces with special features unavailable in current models similarly warrant repair despite costs. Consider that a $100 wheel replacement on a $500 suitcase that provides another five years of service proves far more economical than replacing with another $500 piece. When making repair versus replace decisions, factor in the total lifecycle cost and consider whether repairing extends the useful life enough to justify the investment or merely delays inevitable replacement by months.


